Wizards
The Wizard component is an interactive user interface that guides users through a complex process by dividing it into several simple and sequential steps. Each step presents clear instructions and requests specific information, allowing users to progress linearly from one step to the next.
The importance of a wizard component lies in its ability to simplify potentially confusing or complex tasks, such as registration, initial setup, or the submission of detailed forms. By providing step-by-step instructions and validating data at each stage, wizard components reduce errors, improve the user experience, and increase overall user satisfaction and efficiency. They make web applications more accessible, even for those who are not technically savvy, by making long or complicated processes more manageable and understandable.
Visual Rendering of wizard on Activator Client
Structurally, once interpreted, the rendering of a wizard looks like the image above. However, let's highlight the different structures as listed earlier in the introduction.
The decomposition reveals four main parts:
- The identification of the wizard (its name and description)
- The steps of the wizard
- The content of the current step
- The buttons for navigating between the different steps and submission.
Before delving into detailed explanations of the various structures resulting from the wizard's decomposition (illustrated in the image above☝️), let's first focus on creating a wizard component on Activator Admin🤫.
Wizards On Activator Admin
Creating wizard components on Activator Admin is a structured process that allows developers to design guided user interfaces for complex tasks. This UI widget is managed by four main components:
- The wizard, which contains the actual definition of the wizard.
- The wizard driver, which allows developers to listen to general wizard events and attach behaviors to them.
- The step driver, which displays and manages the content of a step.
- The wizard handler (optional), which, if defined in the wizard, contains the entire logic for processing the data after the wizard is completed.
This process begins with initializing a new wizard, where the number of steps and their sequence are defined. Each step is customizable with specific content and instructions, providing necessary information and input fields for users. Data validation can be configured for each step to ensure the information provided is correct before allowing progression. Activator Admin also facilitates the management of created wizards, enabling their modification and deletion as needed.
Wizard (Definition)
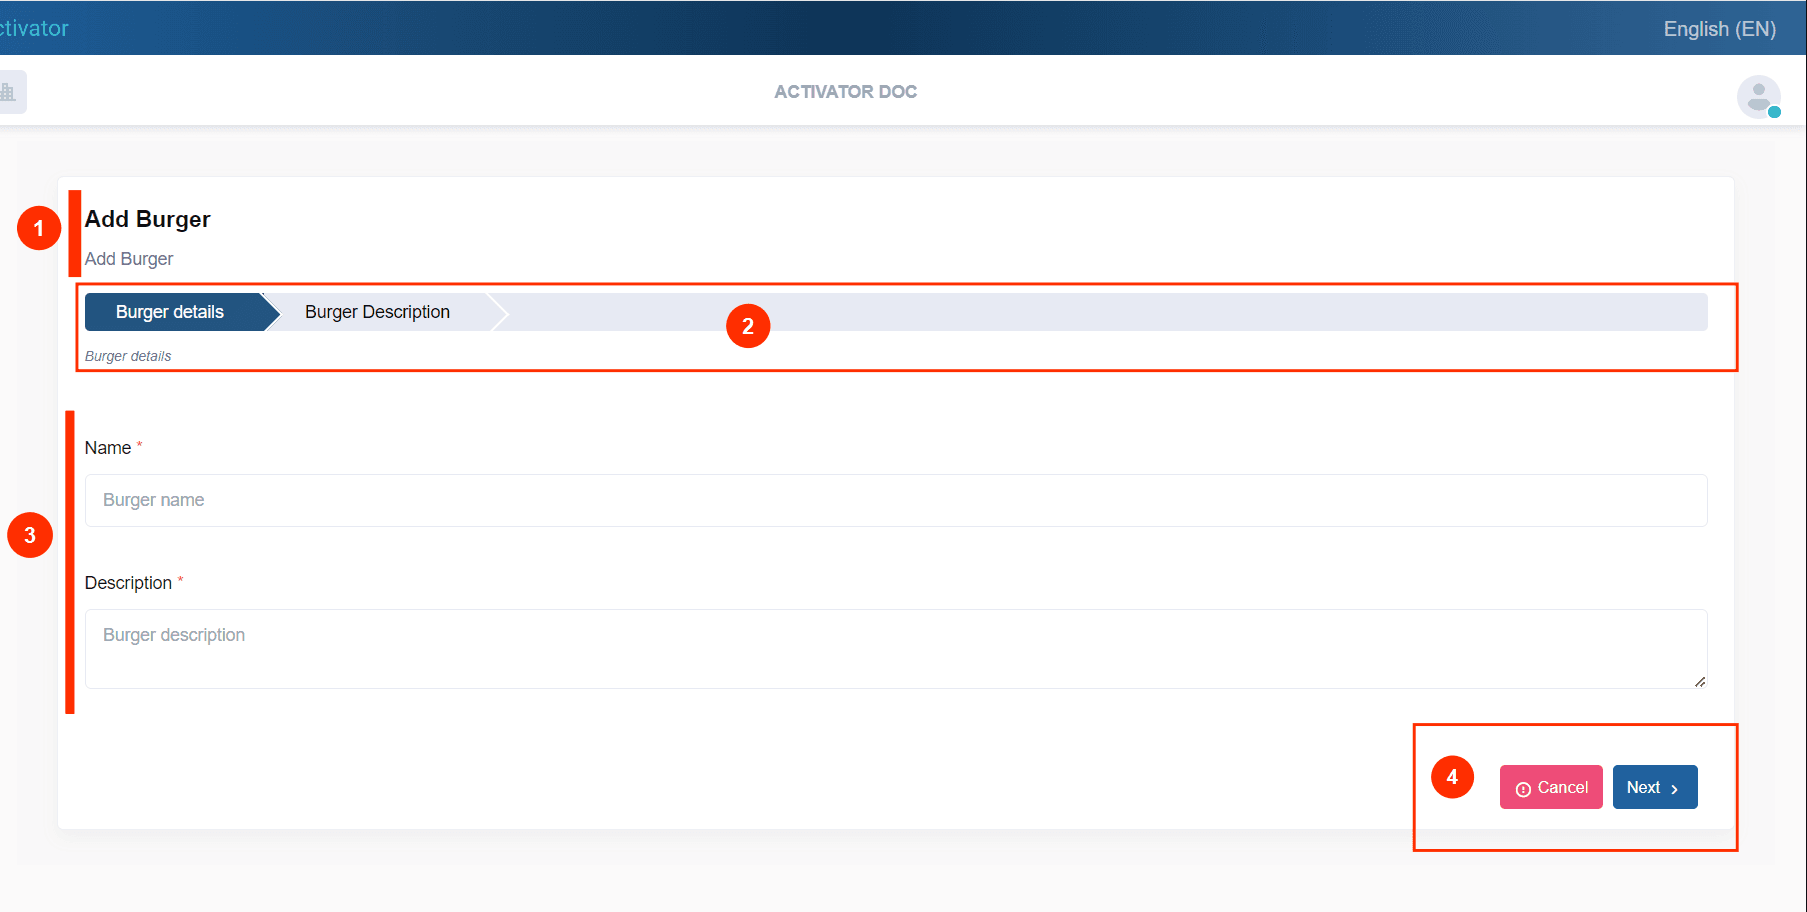
In Activator Admin , the Wizard component is located within the menu container, among the items listed under </>Wizards. As shown at (1) on the image below.
✋CAUTION
Make sure you are in the System Component main module
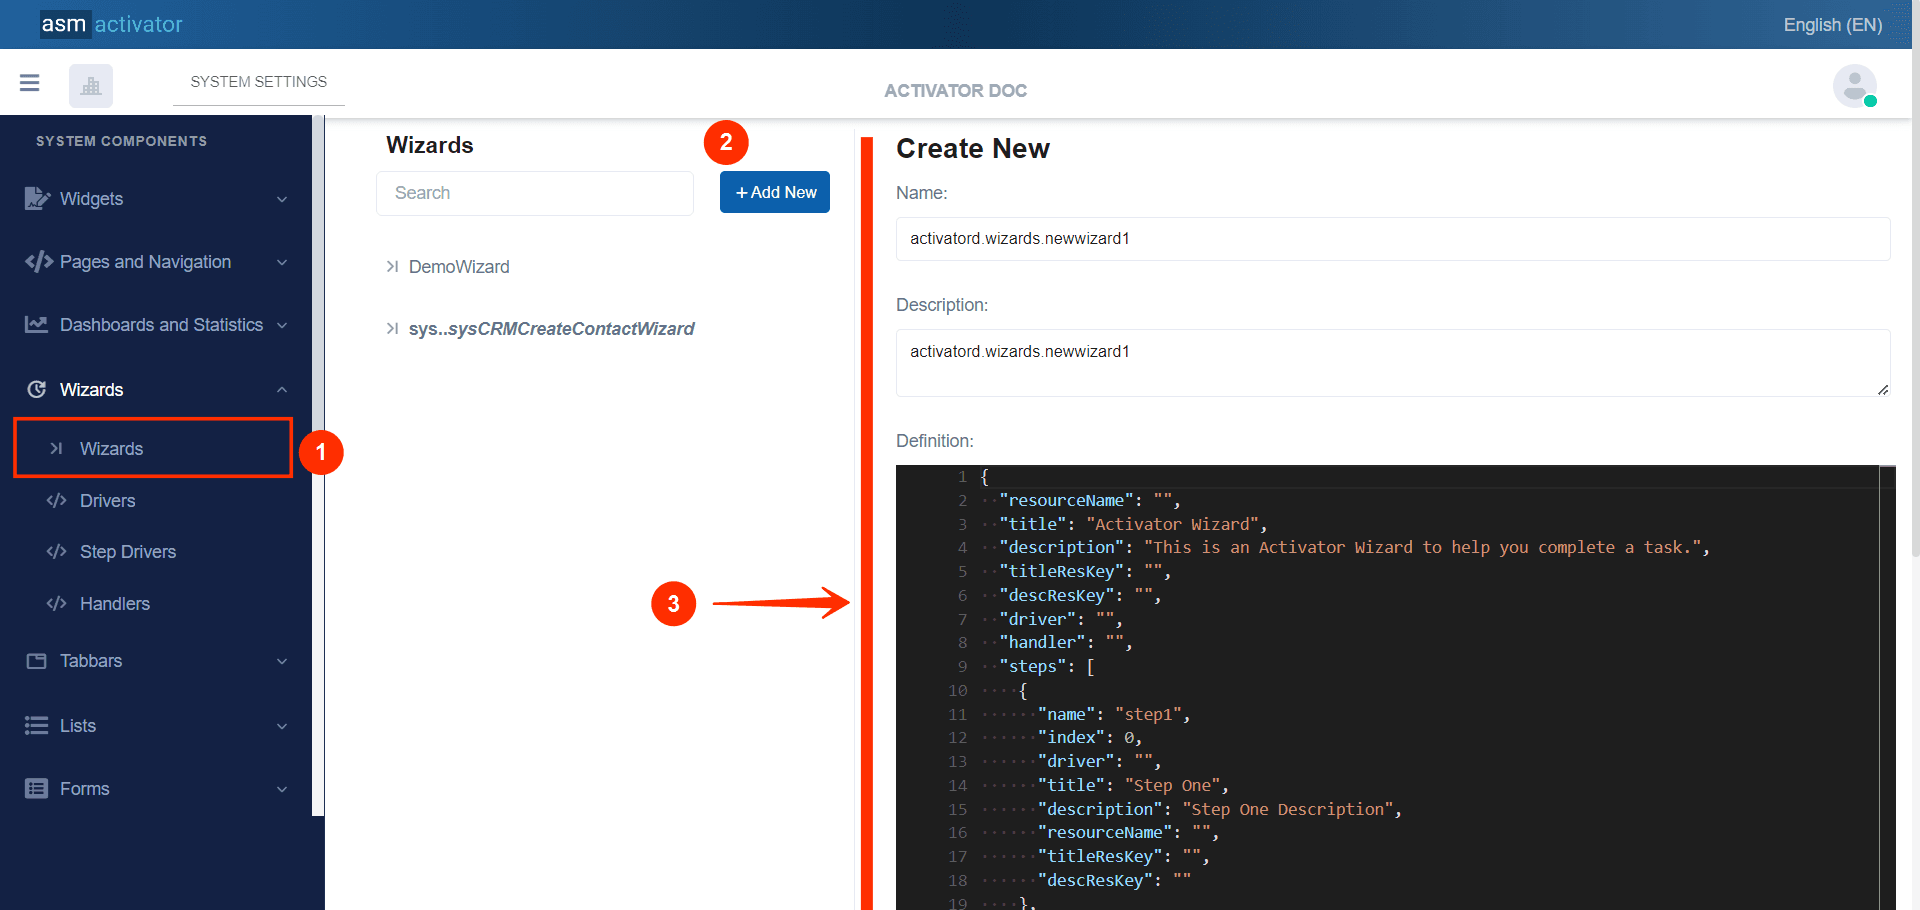
To initiate the creation of a Wizard component, simply click on the +Add new button (illustrated at (2) on the image above). Upon clicking, you’ll observe a form (illustrated at (3) on the image above) appearing on the right side with some fields.
🔬After filling in the name and description fields, let's focus on the Definition and Meta Data fields.
The Meta Data field gathers and provides additional information for the component, such as configuration and parameters, as well as the accessibility and security measures associated with this component. Please refer to Meta Data for the complete list of additional information related to this component.
As for the Definition field, let's take a closer look at its JSON content. Notice that it's here where you will be prompted to fill in various fields. These fields will be used to specify information relating to the identification of the wizard and its steps.
{
    "resourceName": "",
    "title": "Activator Wizard",
    "description": "This is an Activator Wizard to help you complete a task.",
    "titleResKey": "",
    "descResKey": "",
    "driver": "",
    "handler": "",
    "steps": [
        {
            "name": "step1",
            "index": 0,
            "driver": "",
            "title": "Step One",
            "description": "Step One Description",
            "resourceName": "",
            "titleResKey": "",
            "descResKey": ""
        },
        {
            "name": "step2",
            "index": 1,
            "driver": "",
            "title": "Step Two",
            "description": "Step Two Description",
            "resourceName": "",
            "titleResKey": "",
            "descResKey": ""
        }
    ]
}
| PROPERTY | REQUIRED | DEFAULLT VALUE | DESCRIPTION |
|---|---|---|---|
ressourceName | No | By default, this property has an empty value | Represents the associated language resource |
title | Yes | Activator Wizard | Default Wizard Title |
description | No | This is an Activator Wizard to help you complete a task. | Wizard Description |
titleResKey | No | "" | Resource Language Key for the title |
descResKey | No | "" | Resource Language Key for the description. |
driver | Yes | "" | This component will enable us to access and manipulate the various wizard elements. More details about the #Wizard Drivers |
handler | No | "" | Contains the name of the #wizard handler that will be called to process the data when the wizard is completed. NB: Data will be sent to this #wizard handler via an argument named model. |
steps | Yes | | This property contains the list of steps of our Wizard. The minimum number of steps required to register is 2. - |
Wizard Drivers
Being a type of Driver, this component plays a crucial role in the use of wizards within interactive user interfaces. It enables the wizard to communicate effectively and reliably with external resources such as databases, file systems, or APIs. Wizards, which simplify complex processes by breaking them down into easy-to-follow sequential steps, often rely on access to these resources to validate information and record data in real time.
Creation
In Activator Admin , the Wizard Driver component is located within the menu container, among the items listed under </>Wizards. As shown at (1) on the image below.
NB: Make sure you are in the System Component main module.
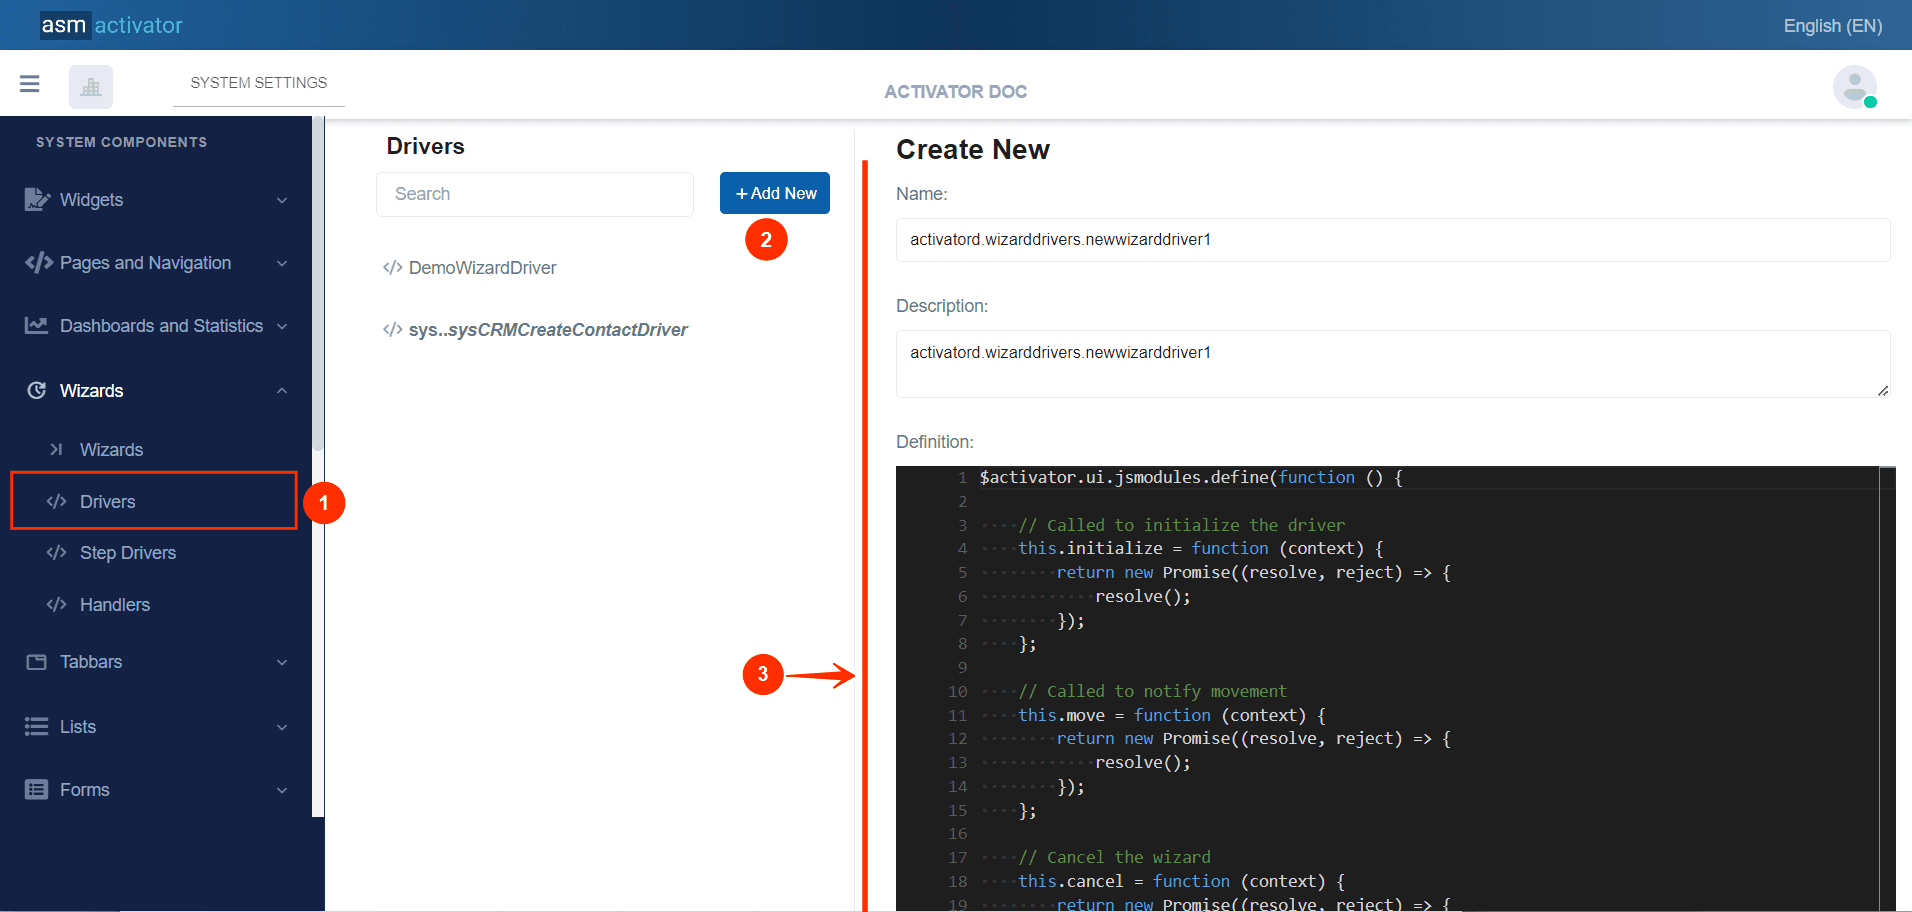
After initiating the creation of the Wizard driver, by clicking on the +Add new button (illustrated at (2) on the image above), you’ll observe a form (illustrated at (3) on the image above) appearing on the right side with some fields.
🔬After filling in the name and description fields, let's focus on the Definition and Meta Data fields.
NB: The name you filled will be the value that you must enter inside the `driver` value in the the #Wizard Definition
The Meta Data field gathers and provides additional information for the component, please refer to Meta Data for the complete list of additional information related to this component.
As for the Definition field, let's take a closer look at its Javascript content in the next point.
Configuring A Driver
The code below presents a basic implementation of the wizard driver, with essential methods to initialize, notify movements, cancel, complete, and handle wizard errors. Each of these methods returns a promise (Promise), allowing operations to be handled asynchronously and reliably. This basic model can be extended to include custom logic based on the specific needs of your application.
$activator.ui.jsmodules.define(function () {
    // Called to initialize the driver
    this.initialize = function (context) {
        return new Promise((resolve, reject) => {
            // Custom initialization logic here
            resolve();
        });
    };
    // Called to notify movement
    this.move = function (context) {
        return new Promise((resolve, reject) => {
            // Custom move handling logic here
            resolve();
        });
    };
    // Cancel the wizard
    this.cancel = function (context) {
        return new Promise((resolve, reject) => {
            // Custom cancellation logic here
            resolve();
        });
    };
    // Handle notification when the wizard is completed
    this.complete = function (context) {
        return new Promise((resolve, reject) => {
            // Custom completion logic here
            resolve();
        });
    };
    // Handle notification when the wizard encounters an error
    this.error = function (context) {
        return new Promise((resolve, reject) => {
            // Custom error handling logic here
            resolve();
        });
    };
});
- Event
initialize
// Called to initialize the driver
this.initialize = function (context) {
    return new Promise((resolve, reject) => {
        // Custom initialization logic here
        resolve();
    });
};
Description: This method is called to initialize the wizard driver. Receives as argument the context that was sent when the wizard was instantiated.
Parameter: context - An object containing configuration information and parameters needed for initialization.
Use case:
- Customize the UI before rendering the wizard
- Perform certain checks before displaying the wizard
- Configure basic settings before launching the wizard
- Prepare data before launching the wizard
- Set up permissions before displaying the wizard
- Event
move
// Called to notify movement
this.move = function (context) {
    return new Promise((resolve, reject) => {
        // Custom move handling logic here
        resolve();
    });
};
Description: This event is triggered each time the user changes step.
Parameter: context -Receives as argument the current context as it was at the time of the step change.
- Event
cancel
// Cancel the wizard
this.cancel = function (context) {
    return new Promise((resolve, reject) => {
        // Custom cancellation logic here
        resolve();
    });
};
Description: This event is called to cancel the wizard.
Parameter: context - Which takes as argument the current context as it was at the time of cancellation.
- Event
complete
// Handle notification when the wizard is completed
this.complete = function (context) {
    return new Promise((resolve, reject) => {
        // Custom completion logic here
        resolve();
    });
};
Description: This method is called when the wizard is successfully completed. It applies to the last step when the user clicks on the complete button.
Parameter: context - Receives as argument the current context as it was at the time of submission, along with the result of wizard handler execution (if configured in the wizard definition)
Note: this is called after execution of the handler (if configured in the wizard definition).
- Event
error
// Handle notification when the wizard encounters an error
this.error = function (context) {
    return new Promise((resolve, reject) => {
        // Custom error handling logic here
        resolve();
    });
};
Description: This method is called when the wizard encounters an error.
Parameter: context - Receives as argument the current context as it was at the time of submission, along with the error resulting of the wizard handler execution (if configured in the wizard definition).
Step Drivers
Being a type of Driver, the Step Driver component allows the developer to define the visual and interactive rendering of the content of a wizard step. Besides the visual aspect, this component also offers the possibility to validate the data collected or processed in its step.
Creation
In Activator Admin , the Step Driver component is located within the menu container, among the items listed under </>Wizards. As shown at (1) on the image below.
✋CAUTION
Make sure you are in the System Component main module
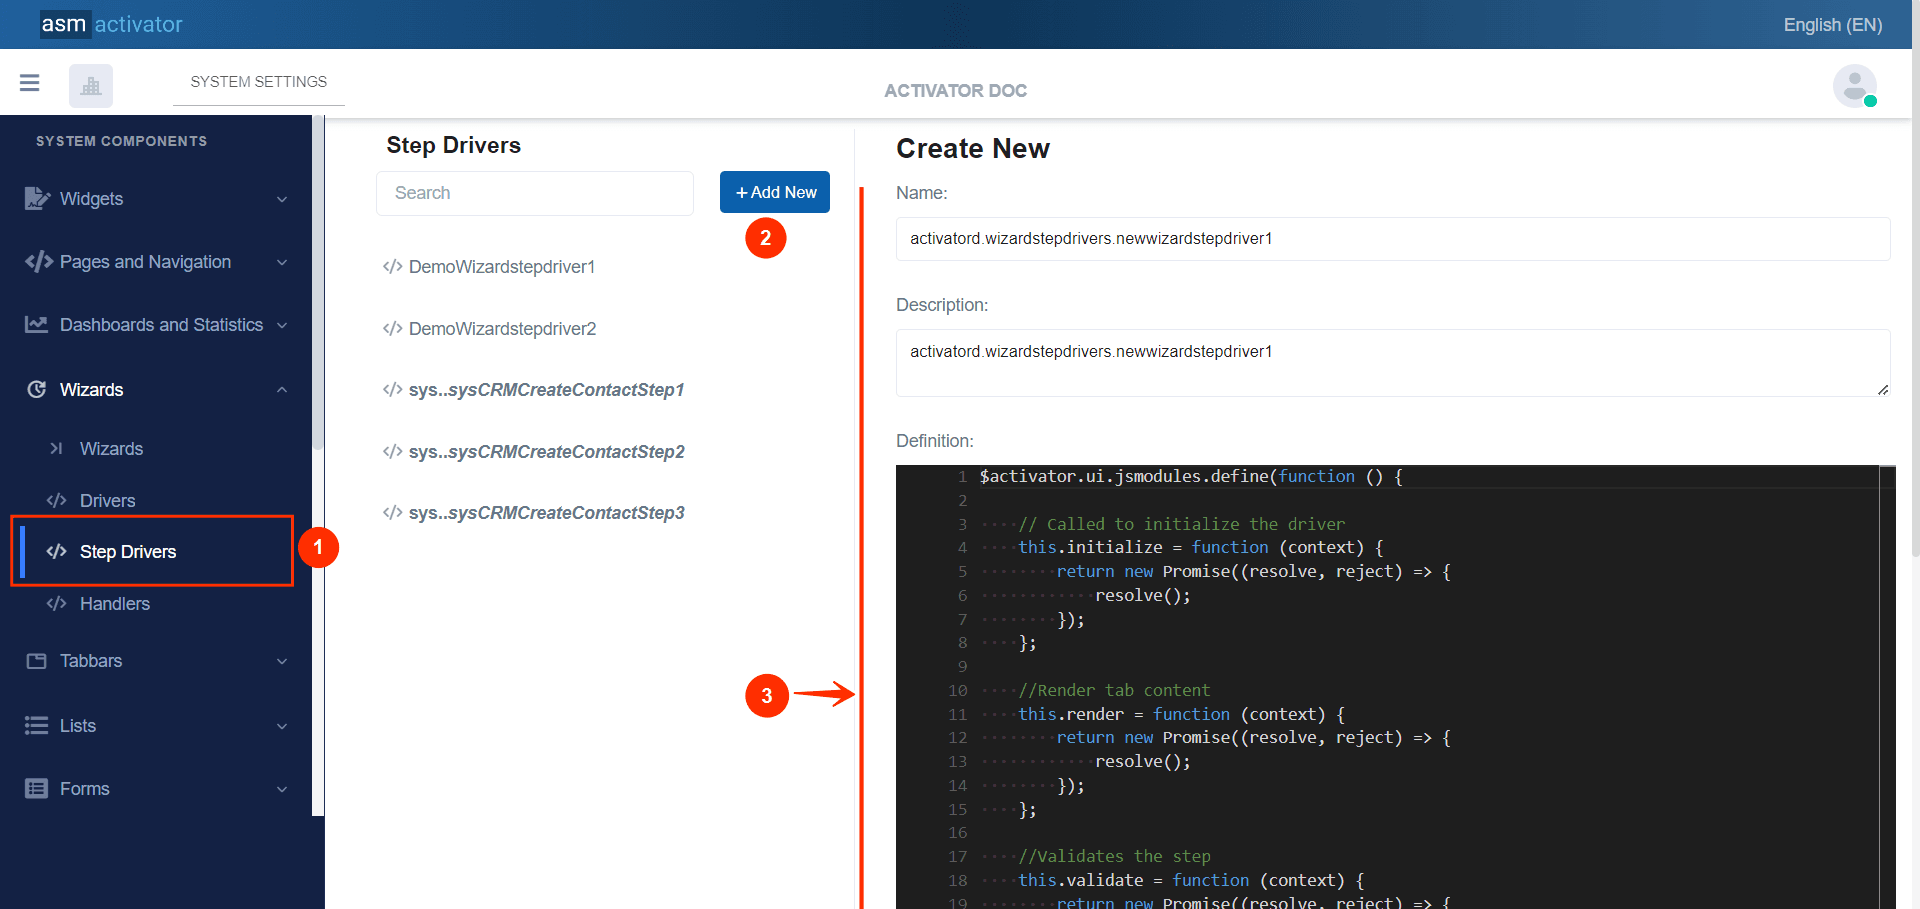
After initiating the creation of the Step driver, by clicking on the +Add new button (illustrated at (2) on the image above), you’ll observe a form (illustrated at (3) on the image above) appearing on the right side with some fields.
🔬After filling in the name and description fields, let's focus on the Definition and Meta Data fields.
NB: The name you filled will be the value that you must enter inside the `driver` value of a step in the #Wizard Definition
The Meta Data field gathers and provides additional information for the component, please refer to Meta Data for the complete list of additional information related to this component.
As for the Definition field, let's take a closer look at its Javascript content in the next point.
Configuring A Step Driver
The basic code that defines a JavaScript snippet for the Step Driver component in Activator Admin is as follows:
$activator.ui.jsmodules.define(function () {
    // Called to initialize the driver
    this.initialize = function (context) {
        return new Promise((resolve, reject) => {
            resolve();
        });
    };
    //Render step content
    this.render = function (context) {
        return new Promise((resolve, reject) => {
            resolve();
        });
    };
    //Validates the step
    this.validate = function (context) {
        return new Promise((resolve, reject) => {
            resolve();
        });
    };
});
The module utilizes promise functions to handle the various stages of initialization, rendering, and validation of a step in the wizard. Here's a detailed explanation of each aspect of the code and examples of functions you might include in each part:
Event initialize
// Called to initialize the driver
this.initialize = function (context) {
    return new Promise((resolve, reject) => {
        resolve();
    });
};- Description: Any action to be performed before the step content is displayed.
- Parameter:
context- contains the container and others data sent on the instanciation of the wizard. - Return: a promise that resolves when the initialization is complete.
Event render
//Render step content
this.render = function (context) {
    return new Promise((resolve, reject) => {
        resolve();
    });
};
The render method is responsible for rendering the content for a step. As with initialize, it takes a context as a parameter and returns a promise.
- Description: Displays and manage the content of the step.
- Parameter:
context- contains the container and other data sent during the instantiation of the wizard, as well as those passed in other steps. - Return: A promise that resolves when the content is rendered
Rendering Example:
// Called to render the step in the wizard
this.render = function (context) {
    return new Promise((resolve, reject) => {
        try {
            // Retrieve the container element from the context
            let container = context.container;
            // Create content for the step
            let stepContent = `
                <form id="identification-form">
                        <div class="row">
                            <div class="col-md-6">
                                <div class="form-group js-form-message">
                                    <label for="firstname" class="input-label">First Name</label>
                                    <input type="text" class="form-control" id="firstname" name="firstname" placeholder="First Name" required>
                                </div>
                            </div>
                            <div class="col-md-6">
                                <div class="form-group js-form-message">
                                    <label for="lastname" class="input-label">Last Name</label>
                                    <input type="text" class="form-control" id="lastname" name="lastname" placeholder="Last Name" required>
                                </div>
                            </div>
                            <div class="col-md-6">
                                <div class="form-group js-form-message">
                                    <label for="phoneNumber" class="input-label">Phone Number</label>
                                    <input type="text" class="form-control" id="phoneNumber" name="phoneNumber" placeholder="Phone Number" required>
                                </div>
                            </div>
                            <div class="col-md-6">
                                <div class="form-group js-form-message">
                                    <label for="emailAddress" class="input-label">Email Address</label>
                                        <input type="email" class="form-control" id="emailAddress" name="emailAddress" placeholder="Email Address" required>
                                </div>
                            </div>
                            <div class="col-md-6">
                                <div class="form-group js-form-message">
                                    <label for="birthDate" class="input-label">Birth Date</label>
                                        <input type="date" class="form-control" id="birthDate" name="birthDate" placeholder="Birth Date" required>
                                </div>
                            </div>
                        </div>
                    </form>
            `;
            // Append the content to the container
            container.innerHTML = stepContent;
            // Resolve the promise to indicate successful rendering
            resolve();
        } catch (error) {
            // Reject the promise if an error occurs during rendering
            reject('Error rendering step: ' + error.message);
        }
    });
};
This example shows how to render the step content dynamically using the information provided in the context object.
Event validate
//Validates the step
this.validate = function (context) {
    return new Promise((resolve, reject) => {
        resolve();
    });
};- Description: Allows the developer to validate the step. Since it returns a promise, if the resolve is called, we go on to the next step, or if we're in the last step, the complete wizard operation is executed.
💡TIP
At this level, the developer can store newly captured step information in the
conrext.model
- Parameter:
context- contains the container and other data sent during the instantiation of the wizard, as well as those passed in other steps. - Return: a promise that resolves if the data is valid, otherwise rejects with an error message.
Example of Validation:
Let's continue with our previous example of the render event where we primarily displayed a mini form. Now, in the validate event, using JQuery Validator (integrated into Activator), let's validate our form.
this.validate = function (context) {
    return new Promise((resolve, reject) => {
        const container = context.container; //The same container passed in the `render` event
        // The form we just created in the `render` event contains "identification-form" as id attribute
        // Jquery validator `valid()` function allows us to check if our form is valid or not
        if (container.find("#identification-form").valid()) {
            resolve();
        } else {
            reject();
        }
    });
};
Best Practices
To make data persist from step to step, we can put them directly in the context.model. And when executing the step driver render, display (take into account) the data directly from the context.model.
Wizard Handler
As Stored Functions, wizard handlers allow developers to perform complex and intensive tasks on the server side, benefiting from greater power and security compared to execution in the client's browser. Once executed, the wizard handler will receive all the data passed in the context.model in an argument named model.
In Activator Admin , the Wizard Handler component is located within the menu container, among the items listed under </>Wizards. As shown at (1) on the image below.
✋CAUTION
Make sure you are in the System Component main module
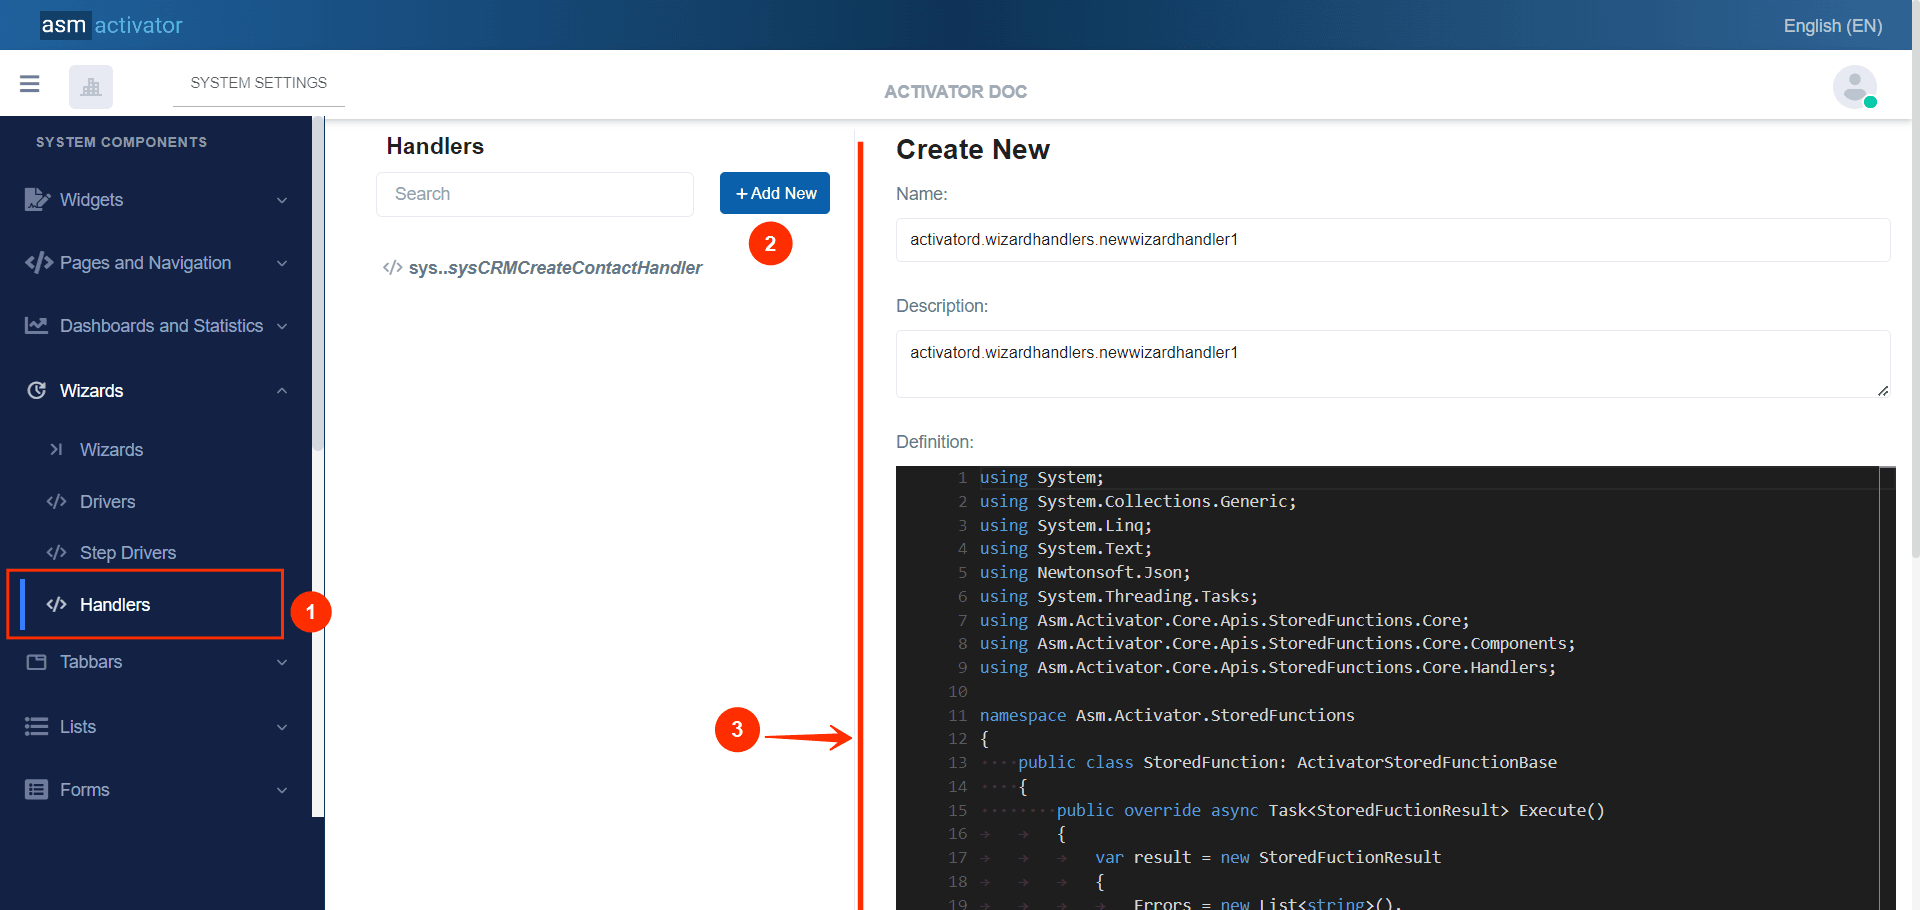
After initiating the creation of the Wizard Handler, by clicking on the +Add new button (illustrated at (2) on the image above), you’ll observe a form (illustrated at (3) on the image above) appearing on the right side with some fields.
🔬After filling in the name and description fields, let's focus on the Definition and Meta Data fields.
NB: The name you filled will be the value that you must enter inside the handler in the #Wizard Definition
The Meta Data field gathers and provides additional information for the component, please refer to Meta Data for the complete list of additional information related to this component.
As for the Definition field, confère la documentation des Stored Function.
Steps Extensions
As a modern ERP, Activator offers various flexible base modules that can be adapted to each tenant's specific needs. Once a module has been obtained by a tenant, they can decide to customize or extend certain components of that module, such as Wizards and others.
For a system Wizard (a system component belongs to a base module or package of Activator, and its definition cannot be modified by a tenant), Activator provides the ability to extend its steps. This operation allows developers to add new steps to those initially present in the Wizard definition.
Let's take a closer look at what this looks like in the following image.
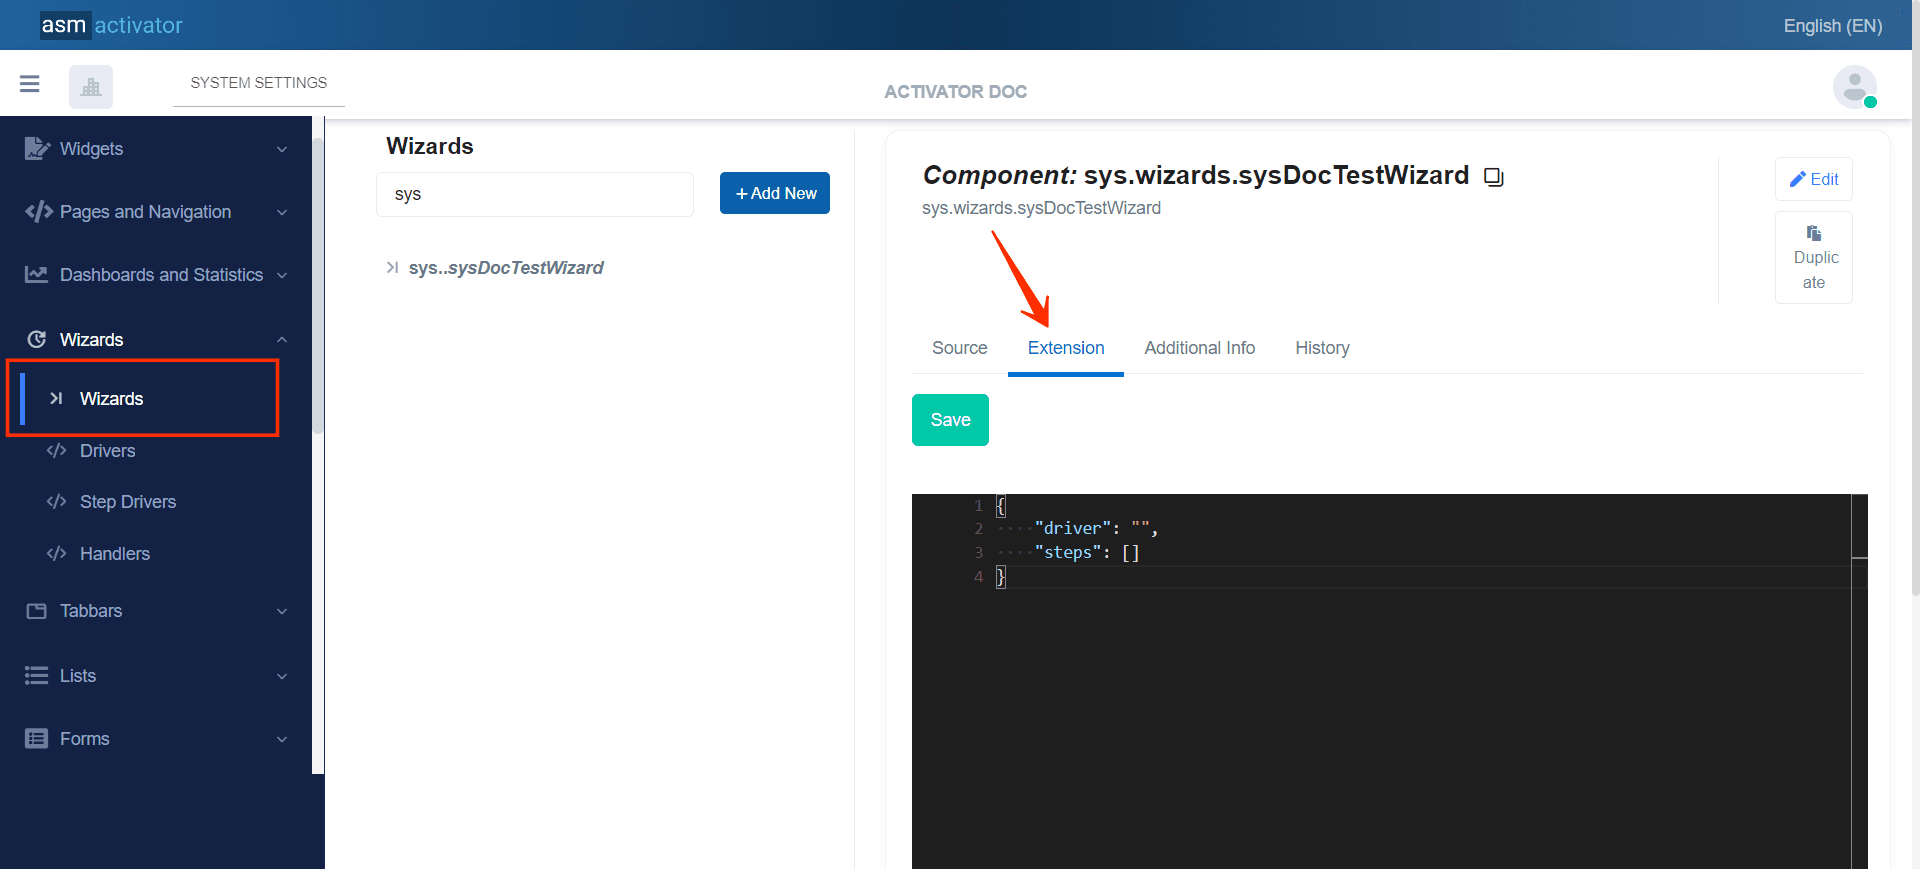
To access the extension of a Wizard, simply go to the Extension tab, to the right of the source tab where the component definition is displayed (as illustrated in the image above).
The default model provided is an object containing an empty field named driver and an initially empty collection of steps.
- The
driverfield: This is not required. It allows the developer to manipulate the data that will be captured in the steps of the extension. If the developer decides not to provide a driver for the extension, they should ensure that the data model returned by the new steps will also be processed by the native driver and/or handler in the wizard. The
stepsfield: This is where the developer must insert the desired extended steps. The elements to be inserted must follow the same format as those inserted in thestepsfield of the Wizard definition itself.Note: This field is not required by default. However, it is not possible to define an extension
driverwhile leaving thisstepsfield empty.
Example of use.
{
    "driver": "activatord.wizards.newwizard3",
    "steps": [
        {
            "name": "step33",
            "index": 33,
            "driver": "activatord.wizardstepdrivers.newwizardstepdriver3",
            "title": "Additionnal Information",
            "description": "Additionnal Information",
            "resourceName": "",
            "titleResKey": "",
            "descResKey": ""
        }
    ]
}
✋CAUTION
Extensions only apply to system Wizards.
The
nameattribute of the newly extended step should not be previously used as anamein any of the steps present in the base definition and must also be unique in the list of extended steps.The extended step will be mixed and sorted via its
indexfield with the other native steps of the Wizard, then displayed according to the order obtained by the sorting. Therefore, the developer will need to adjust the value of theindexfield according to the display position they want the new extended step to occupy.
How To Instanciate A Wizard
Below you will find the code needed for the wizard instanciation.
const wizardInstance = $activator.ui.renderWizard({
    container: "", // The JQuery DOM container
    name: "", // The wizard name
    model: {
        // Add the necessary data for the wizard here
        // If your wizard does not expect any param, just send an empty object {}
    }
});

wizardInstance.onComplete = function () {
    // Stuff to be doing when the wizard has been completed
};
wizardInstance.onCancel = function () {
    // Stuff to be doing when the wizard has been cancelled
};
Description
Description: The $activator.ui.renderWizard function is called to display a wizard. This function takes an object as argument, with the following properties:
container: The DOM container where the wizard will be rendered.name: The full name that identifies the wizard to be displayed.model: The data model to be passed to the wizard. In this example, an empty object is used, but in a real application, this object could contain data necessary for the wizard to function.
Example of use
Let's consider in our example that we are in a Menu Driver Item, and we want to display our wizard in the Menu Item that implements it. One of the solutions to do this is as follows:
$activator.ui.jsmodules.define(function () {
    // Called to initialize the driver
    this.initialize = function (context) {
        return new Promise((resolve, reject) => {
            resolve();
        });
    };
    // Manage menu item click event
    this.onItemClick = function (context) {
        const wizardInstance = $activator.ui.renderWizard({
            container: context.container,
            name: 'activatord.wizards.DemoWizard',
            model: {
                // Add the data required for the wizard here
                // If your wizard does not expect any param, just send an empty object {}
            }
        });

        wizardInstance.onComplete = function () {
            // Stuff to be doing when the wizard has been completed
            //Example
            alert("Your datas has been submitted successfully");
        };
        wizardInstance.onCancel = function () {
            // Stuff to be doing when the wizard has been cancelled
            //Example
            alert("You have cancelled the form");
        };
    };
});
✋IMPORTANT: Wizard Initialization can be done anywhere in component of type Driver (Helper, Content Provider, Driver, Menu Item Driver, #Tabbar Driver, etc…).
Viewing Wizards On Activator Client
Activator Client allows us to visualize and interact with the wizards created and configured on Activator Admin. This interaction will include navigating between the different steps, providing information through each step, which will be validated based on the configuration established by the developer.
Navigating through the wizard steps on Activator Client is intuitive and seamless. Users can progress from one step to another is facilitated by buttons such as "Next" and "Previous,". The navigation is designed to be linear but may also incorporate specific validations and conditions that must be met before progressing.
The user must trigger the element that enables the wizard to be rendered. In the case of our last #example, we'll just click on the menu item that accesses our wizard.
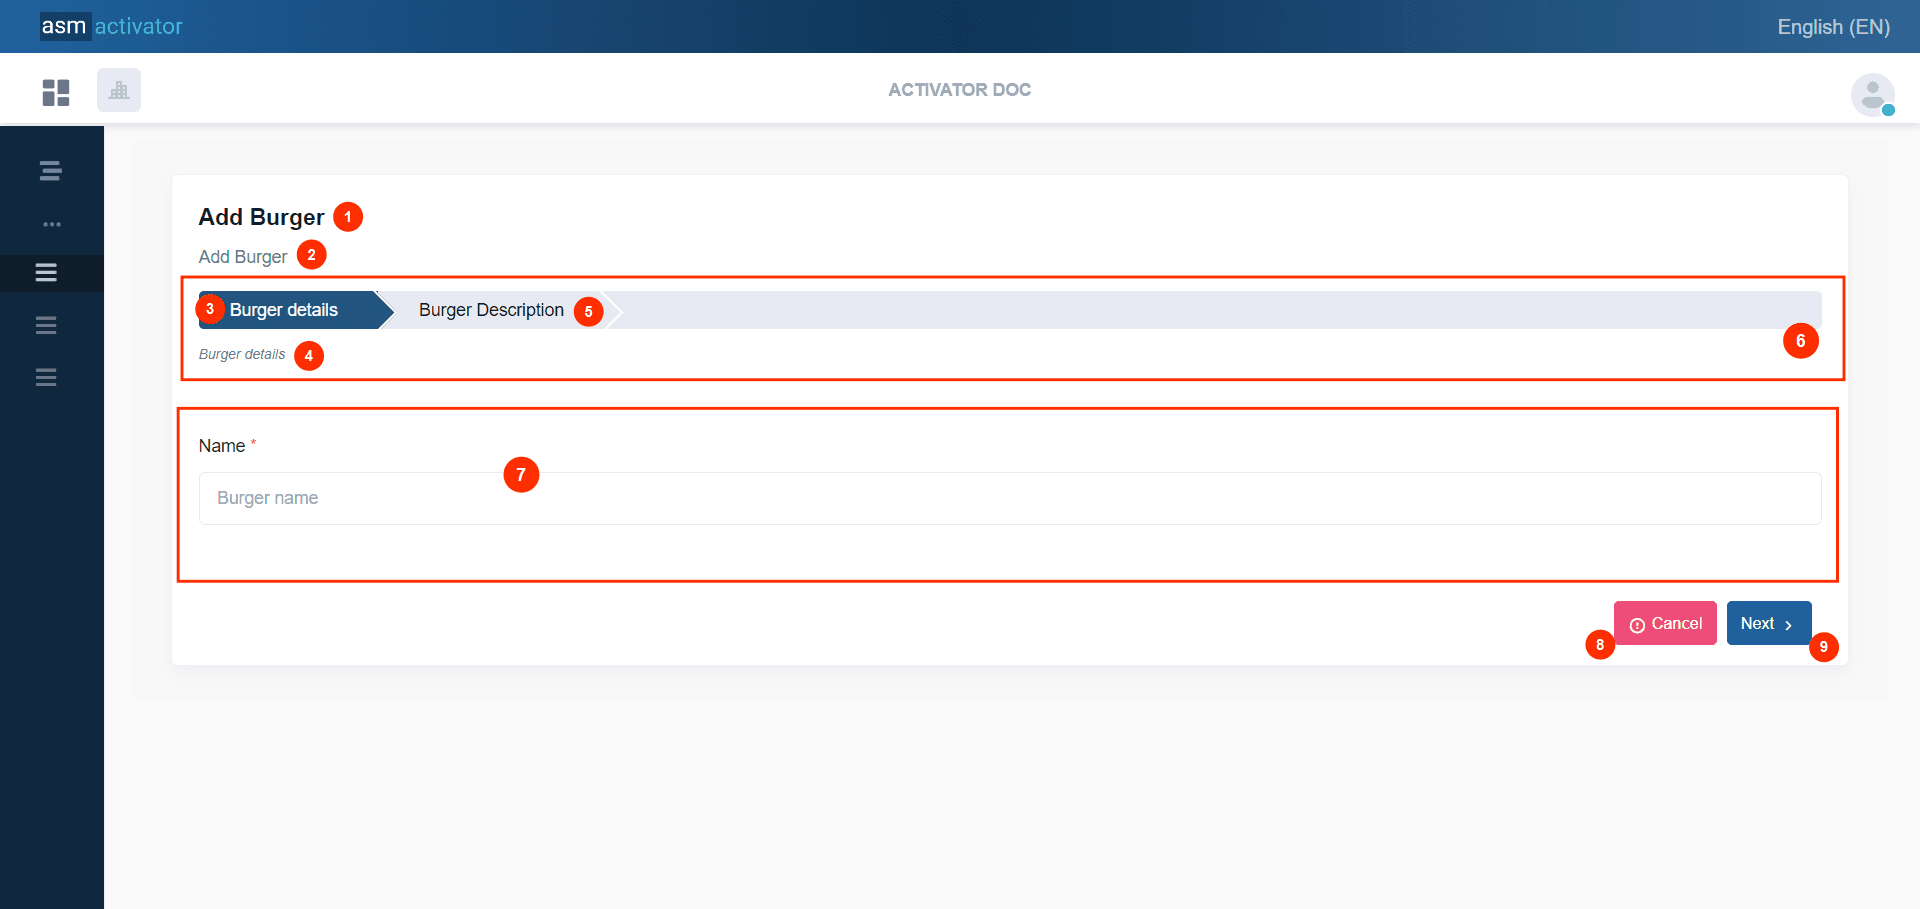
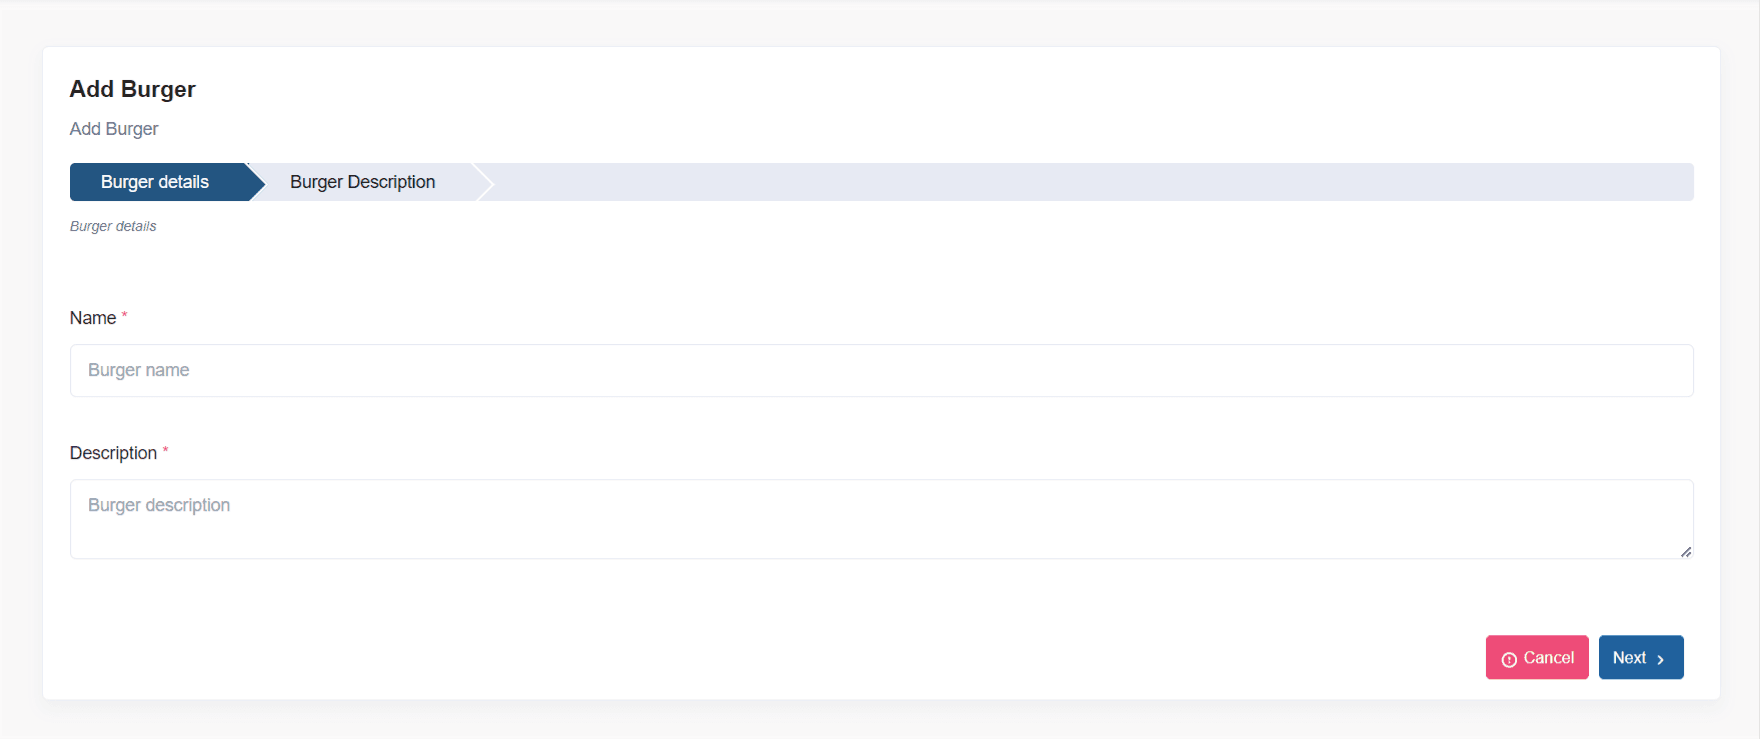
he image above represents the first step of a wizard. We can observe the following elements:
- The title of the wizard
- The description of the wizard
- The current step title (with a blue backgroud 🔵)
- The current step description
- An upcoming step title (with a grey backgroud 🌫️)
- Bar which contains the list of steps
- The current step content (the result of the execution of its step driver)
- The cancel button (when this button is clicked, the wizard instance
.onCancel()event is called in the component in which the wizard is initialized) - The next button (when this button is clicked, the
.move()event contained in the wizard driver is called)
This image shows elements that appear in the second step of the wizard.
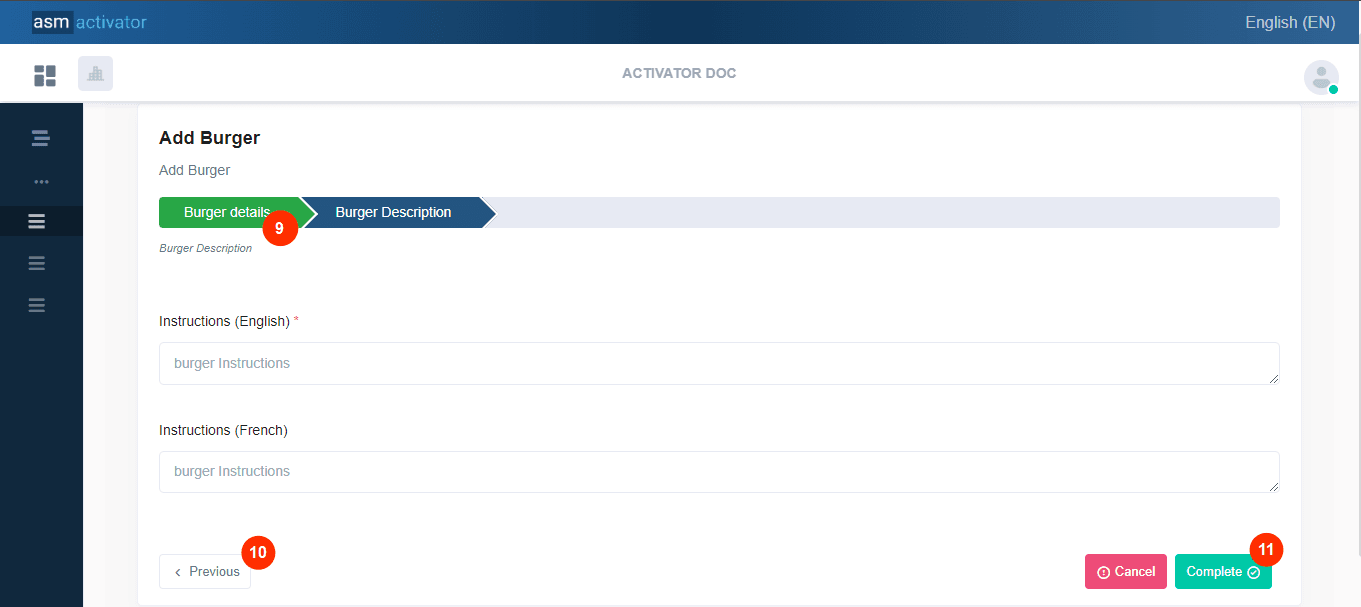
- A completed step (with a blue backgroud 🟩)
- The previous button (appears from the second step, so when this button is clicked, the
.move()event contained in the wizard driver is called) - The complete button (appears at the last step), Once this button has been clicked, if the wizard implements a handler, this is executed, then the wizard driver is executed, and once all these components have been executed, the wizard instance
.onComplete()event is executed (in the component in which the wizard is initialized).
Conclusion
In conclusion, Activator Wizard component is a tool for streamlining complex tasks by breaking them down into sequential steps. It enhances user experience by providing clear guidance and visual progress indicators, ensuring that users can complete multi-step forms with ease and confidence. Now that we have seen how to separate forms into multiple steps, we suggest you check out the Activator Tabbars component, which will allow you to display these newly collected data under different tabs.