Roles
A role🚦 is a way to define a set of specific permissions or responsibilities for a user, a component, or records in Activator. A role determines what a user can or cannot do by controlling access to certain features or data.
Note🔋:
The roles created here will be defined in the accessControls of various components and their additional Info.
They are also used in stored functions to increase security and avoid certain vulnerabilities.
Access Control
Access Control is a menu for managing roles and users on Activator Admin. For more information on this menu, please click here.
How To Create A Role
In Activator Admin, Role are located within the menu container, among the items listed under 🔑Access Control. As shown at (1) on the image below.
✋NB:
Make sure you are in the System Components main module.
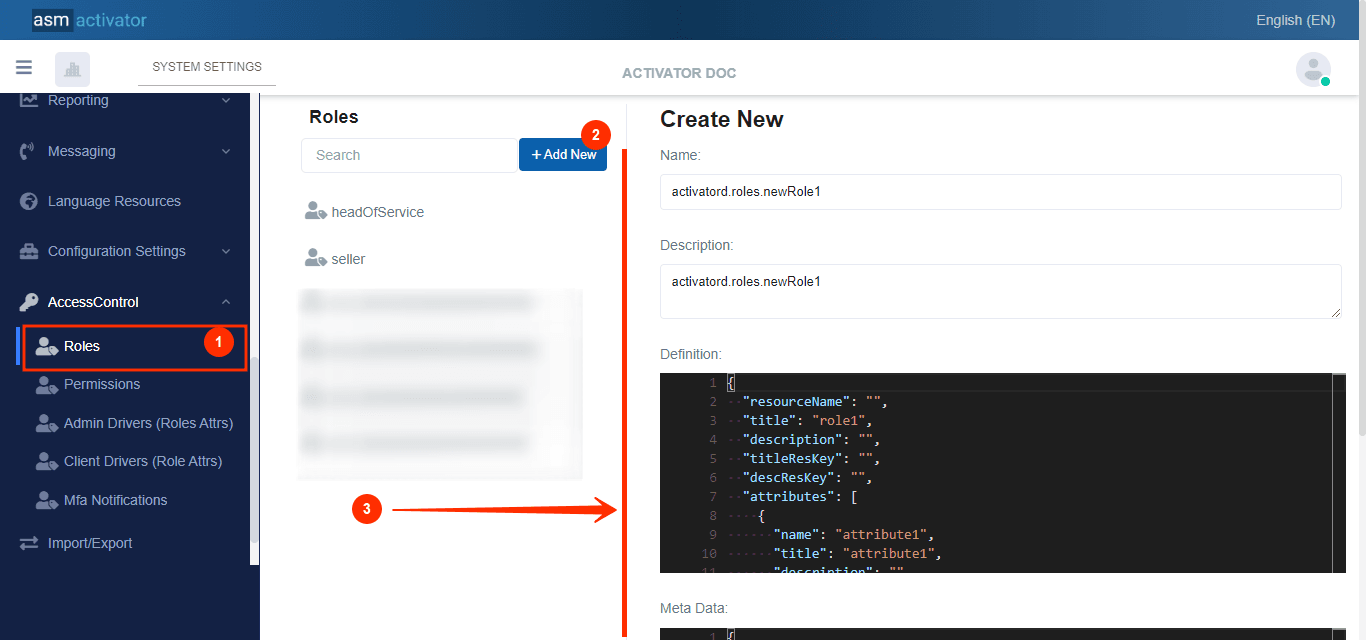
After initiating the creation of the Role, by clicking on the +Add new button (illustrated at (2) on the image above), you’ll observe a form (illustrated at (3) on the image above) appearing on the right side with some fields
🔬After filling in the name and description fields, let's focus on the Definition and Meta Data fields.
The Meta Data field gathers and provides additional information for the component, please refer to Meta Data for the complete list of additional information related to this component.
This is where you'll be prompted to fill in various fields for the creation of a role. These fields will be used to define specific properties for the role.
{
    "resourceName": "",
    "title": "role1",
    "description": "",
    "titleResKey": "",
    "descResKey": "",
    "attributes": [
        {
            "name": "attribute1",
            "title": "attribute1",
            "description": "",
            "titleResKey": "",
            "descResKey": "",
            "dataType": "string",
            "required": false
        }
    ],
    "driverConfiguration": {
        "clientAttributesDriver": "",
        "adminAttributesDriver": ""
    }
}
🚨🚨NB:
When creating a role, two additional components come into play (
clientAttributesDriverandadminAttributesDriver), defined in thedriverConfigurationproperty, which are optional, in addition to the mandatory definition of the role itself.
Json Description
Let's see how each property contributes to the definition and configuration of role in the system.
| PROPERTY | REQUIRED | DEFAULLT VALUE | DESCRIPTION |
|---|---|---|---|
resourceName | No | "" | The name of the resource associated with the role. |
title | Yes | "" | Role title |
description | No | "" | A detailed description of the role, explaining its use or function. |
titleResKey | No | "" | Resource key for title translation. |
descResKey | No | "" | Resource key for description translation. |
attributes | Yes | [] (empty array) | A table of attributes associated with the role. Each attribute defines a role-related specificity. The definition of an attribute requires the definition of several properties:
|
driverConfiguration | No | {}(empty object) | Allows you to capture role information in a more user-friendly way and in relation to other data. It is defined by:
|
Attributes
An example of a role with an attribute:
Head Of Servide: {
  departmentName: "Design"
}
An example of a role without attributes:
General manager (no attribute)
Driver Configuration
driverConfiguration.clientAttributesDriver
In Activator Admin, client driver are located within the menu container, among the items listed under 🔑Access Control. As shown at (1) on the image below.
✋NB:
Make sure you are in the System Components main module.
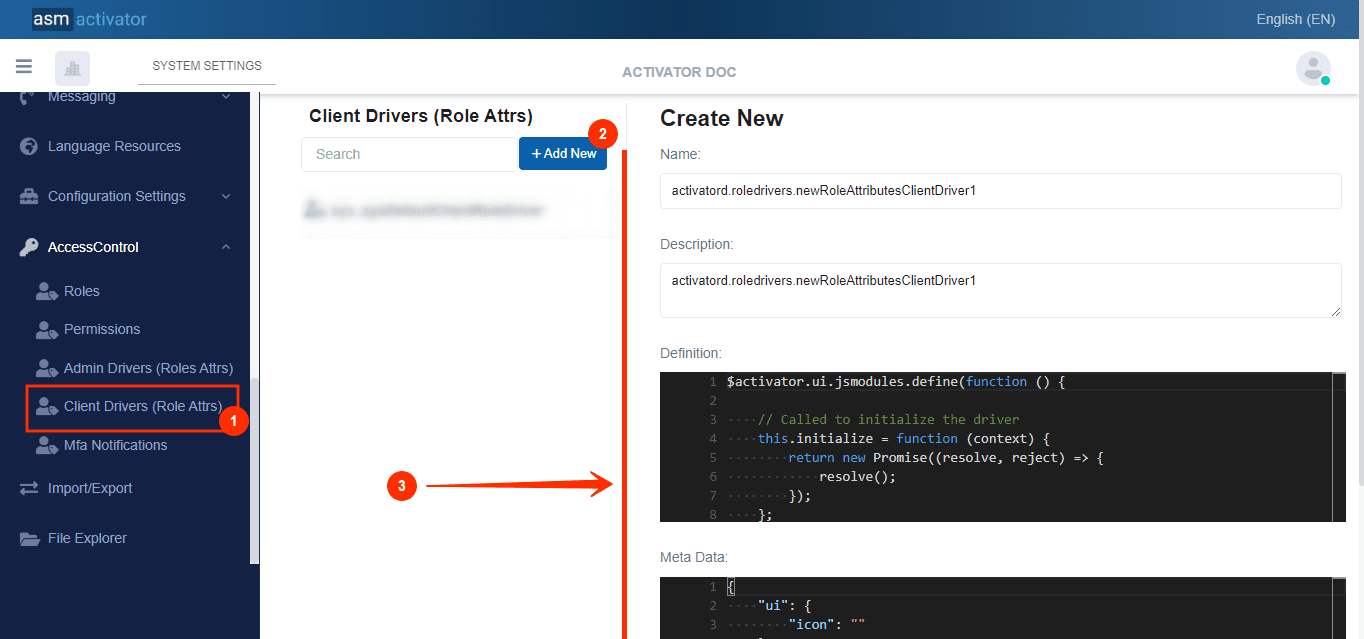
After initiating the creation of the client driver, by clicking on the +Add new button (illustrated at (2) on the image above), you’ll observe a form (illustrated at (3) on the image above) appearing on the right side with some fields
🔬After filling in the name and description fields, let's focus on the Definition and Meta Data fields.
The Meta Data field gathers and provides additional information for the component, please refer to Meta Data for the complete list of additional information related to this component.
Definition Content:
$activator.ui.jsmodules.define(function () {

    // Called to initialize the driver
    this.initialize = function (context) {
        return new Promise((resolve, reject) => {
            resolve();
        });
    };

    // Configures an existing user's attributes
    this.updateUserAttributes = function (context) {
        return new Promise((resolve, reject) => {
            //return an array of attributes
            //See example below
            //var userAttributes = [
            //    {
            //        "name": "attributeNameOne",
            //        "value": "ValueNameOne"
            //    },
            //    {
            //        "name": "attributeNameTwo",
            //        "value": "ValueNameTwo"
            //    }
            //]
            //resolve(userAttributes);
        });
    };

});
Description of the definition
| PROPERTY | DESCRIPTION |
|---|---|
this.initialize = function (context) | This method is used to initialize the driver. |
this.updateUserAttributes = function (context) | is responsible for rendering the interface to capture the correct information for a role. |
| An example is provided to show the general structure of user attributes. The userAttributes array must contain objects, each with a name and a value. |
resolve(userAttributes) | Once the attributes have been collected, they are resolved in the promise |
Once the promise is resolved in updateUserAttributes, the developer can use the userAttributes array with a .then() to perform the desired operation.
adminAttributesDriver
In Activator Admin, admin driver are located within the menu container, among the items listed under 🔑Access Control. As shown at (1) on the image below.
✋NB:
Make sure you are in the System Components main module.
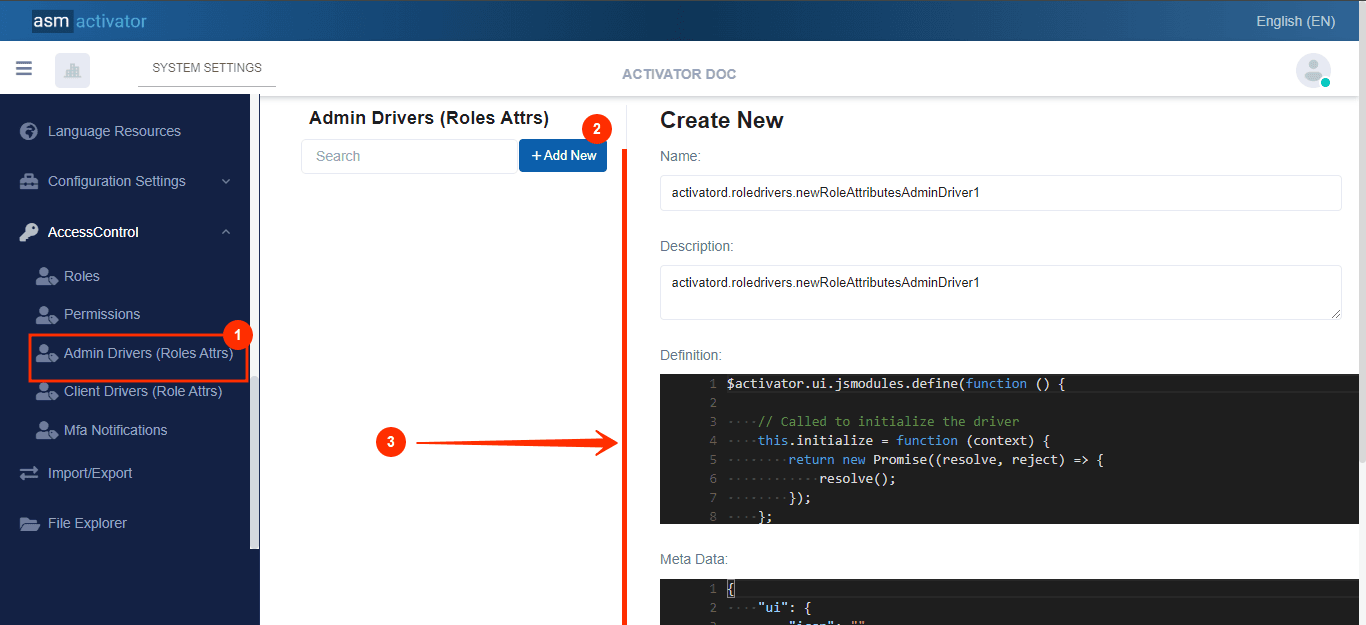
After initiating the creation of the admin driver, by clicking on the +Add new button (illustrated at (2) on the image above), you’ll observe a form (illustrated at (3) on the image above) appearing on the right side with some fields
🔬After filling in the name and description fields, let's focus on the Definition and Meta Data fields.
The Meta Data field gathers and provides additional information for the component, please refer to Meta Data for the complete list of additional information related to this component.
Definition Content:
$activator.ui.jsmodules.define(function () {

    // Called to initialize the driver
    this.initialize = function (context) {
        return new Promise((resolve, reject) => {
            resolve();
        });
    };

    // Configures a new user's attributes
    this.createUserAttributes = function (context) {
        return new Promise((resolve, reject) => {
            //return an array of attributes
            //See example below
            //var userAttributes = [
            //    {
            //        "name": "attributeNameOne",
            //        "value": "ValueNameOne"
            //    },
            //    {
            //        "name": "attributeNameTwo",
            //        "value": "ValueNameTwo"
            //    }
            //]
            //resolve(userAttributes);
        });
    };

    // Configures an existing user's attributes
    this.updateUserAttributes = function (context) {
        return new Promise((resolve, reject) => {
            //return an array of attributes
            //See example below
            //var userAttributes = [
            //    {
            //        "name": "attributeNameOne",
            //        "value": "ValueNameOne"
            //    },
            //    {
            //        "name": "attributeNameTwo",
            //        "value": "ValueNameTwo"
            //    }
            //]
            //resolve(userAttributes);
        });
    };

});
Description of the definition
| PROPERTY | DESCRIPTION |
|---|---|
this.initialize = function (context) | This method is used to initialize the driver. |
this.updateUserAttributes = function (context) | is responsible for rendering the interface to capture the correct information for a role. |
| An example is provided to show the general structure of user attributes. The userAttributes array must contain objects, each with a name and a value. |
resolve(userAttributes) | Once the attributes have been collected, they are resolved in the promise |
this.createUserAttributes = function (context) | This method will be called up when creating a user in Activator Admin. For more details on how to created a user. |
How To Execute A Role Driver
The code used to execute a role driver is as follows👇:
$activator.accessControl
.editUserRoleAttributes({
    container: the_container, // nor the role drive is going to open itself on a activatorModal
    roleName: the_role_title,
    name: the_role_name,
    roleId: the_role_id,
    // Your can pass others stuffes such as:
    // - current attributes values of the user,
    // - callback if you want to know went an operation is done,
    // - events,
    // - etc..
})
.then((attributes) => {

    // console.log(attributes);
    // Make the process logic
})
APIs For Communicating With Roles
- Get All Roles
| METHOD | DESCRIPTION |
|---|---|
| Stored Function | |
- Get Role Attributes
| METHOD | DESCRIPTION |
|---|---|
| Stored Function | |
- Get Role Attribute Value
| METHOD | DESCRIPTION |
|---|---|
| Stored Function | |
- User Is In Role
| METHOD | DESCRIPTION |
|---|---|
| API |
Method(GET) |
| Stored Function | |
- Get Users With The Attribute Value
| METHOD | DESCRIPTION |
|---|---|
| API |
Method(GET) |
| Stored Function | |
- Get Users In A Role
| METHOD | DESCRIPTION |
|---|---|
| API |
Method(GET) |
| Stored Function | |
- Gets The User Role Attribute Value
| METHOD | DESCRIPTION |
|---|---|
| API |
Method(GET) |
Gets The Users With A Given Role
| METHOD | DESCRIPTION |
|---|---|
| API |
Method(GET) |
Conclusion
In conclusion⌛, the role component in the Activator environment plays a key role in managing permissions and responsibilities within the system. By defining roles and associating them with users or groups, it becomes possible to structure access to features and data in a secure and flexible manner. Roles allow precise control over what each user can or cannot do, while simplifying centralized access management. With integrated APIs and functions, developers can easily manipulate roles, assign attributes, and dynamically check user rights, offering a powerful tool to adapt user experiences and security to the specific needs of each tenant.