Permissions
Permissions🔐 are essential control components that define access rights to certain records or specific resources in Activator. They play a crucial role in managing data security and integrity, ensuring that only authorized users can interact with sensitive information.
How To Define A Permission
In Activator Admin, Permission are located within the menu container, among the items listed under 🔑Access Control. As shown at (1) on the image below.
✋NB:
Make sure you are in the System Components main module.
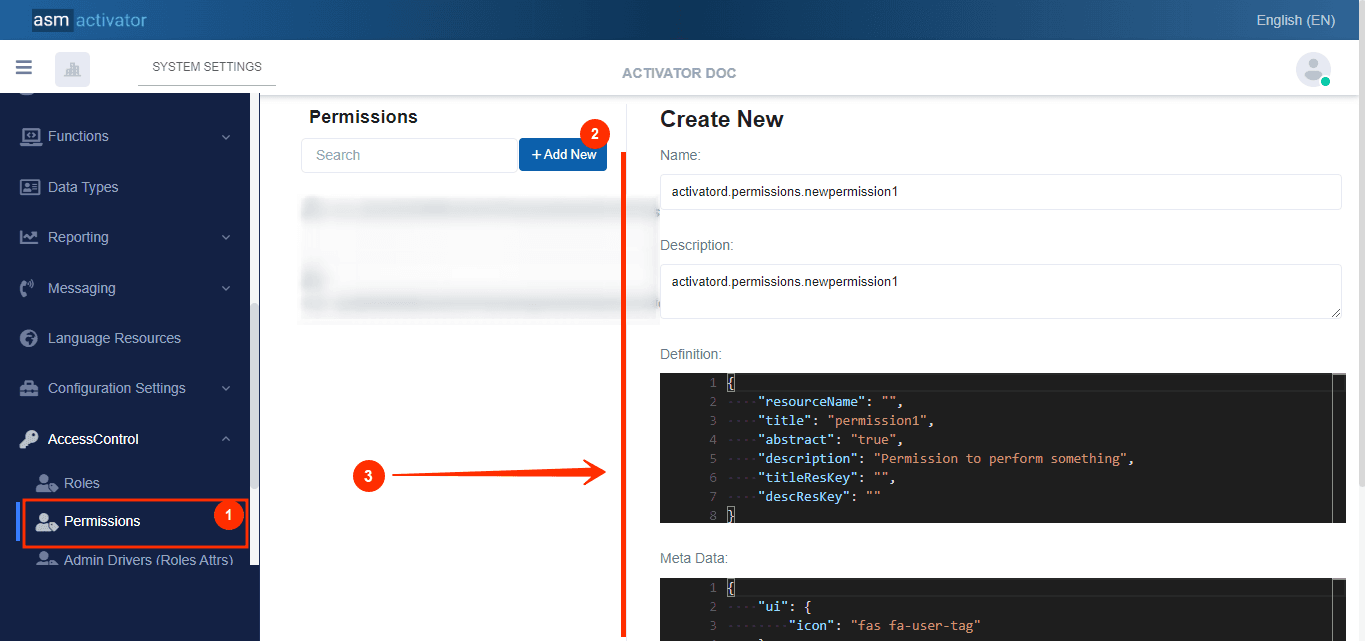
After initiating the creation of the Permission, by clicking on the +Add new button (illustrated at (2) on the image above), you’ll observe a form (illustrated at (3) on the image above) appearing on the right side with some fields
🔬After filling in the name and description fields, let's focus on the Definition and Meta Data fields.
The Meta Data field gathers and provides additional information for the component, please refer to Meta Data for the complete list of additional information related to this component.
As for the Definition field, let's take a closer look at its Json content in the next point.
Definition
Note✍️ : This is where you'll be prompted to fill in various fields for the creation of a permission. These fields will be used to define specific properties for the permission.
{
    "resourceName": "",
    "title": "permission1",
    "abstract": "true",
    "description": "Permission to perform something",
    "titleResKey": "",
    "descResKey": ""
}
Json Description
Let's see how each property contributes to the definition and configuration of permission in the system.
| PROPERTY | REQUIRED | DEFAULLT VALUE | DESCRIPTION |
|---|---|---|---|
ressourceName | No | - | The name of the resource to which the permission applies. |
title | Yes | - | The title of the permission, to identify it |
abstract | No | false | The
In summary, the |
description | No | - | A brief description of the permission, explaining what it can do. |
titleResKey | No | - | Resource key for title, used for translation. |
descResKey | No | - | Resource key for description, used for translation. |
Granting Permission To A User
| PROPERTY | DESCRIPTION |
|---|---|
| URL |
|
| METHOD | POST |
| PAYLOAD (BODY) | The payload is a JSON object containing two main sections: -
-
|
Note🚧:
Currently, in Activator, the
identityobject'stypeproperty only supports theusertype. Similarly, thetypeproperty of theresourceobject is limited to theEntityRecordtype.Make sure you respect these constraints when granting permissions.
Remove A User's Permission
| PROPERTY | DESCRIPTION |
|---|---|
| URL |
|
| METHOD | POST |
| PAYLOAD (BODY) | The payload is a JSON object containing two main sections: -
-
|
Note🚧:
Currently, in Activator, the
identityobject'stypeproperty only supports theusertype. Similarly, thetypeproperty of theresourceobject is limited to theEntityRecordtype.Be sure to respect these constraints when removing permissions.
Check If A User Has Permission
In Activator, checking whether a user has a permission can be done for both abstract and non-abstract permissions.
Check Non-Abstract Permission
| PROPERTY | DESCRIPTION |
|---|---|
| URL |
|
| METHOD | POST |
| PAYLOAD (BODY) |
|
Check Abstract Permission
| PROPERTY | DESCRIPTION |
|---|---|
| URL |
|
| METHOD | GET |
Examples
Restrict a member's confidential access
Case 1
We can simply create a permission called canAccessMemberConfidentialInfo.
activatord.permissions.canAccessMemberConfidentialInfo:
{
    "resourceName": "",
    "title": "Permission to access member confidential info",
    "abstract": "true",
    "description": "Permission to access member confidential info",
    "titleResKey": "",
    "descResKey": ""
}
And when this permission is granted, the Payload will be:
{
    "identity": { //The user we want to grant the access
        "recordId": "the_user_id",
        "name": "the_user_name",
        "type": "User"
    },
    "resource": { // The resource we want to secure
        "recordId": "the_resource_id",
        "name": "the_resource_name",
        "context": "",
        "type": "EntityRecord"
    }
}
| PROPERTY | Description |
|---|---|
identity |
|
resource |
|
Case 2
Let's🚶♂️ assume that here we want to be much more modular and abstract in order to allow our permission to secure other categories of member data (such as location, contacts, etc.).
In this case, all we need to do is play with the context, and insert the type of data this user will be able to access.
Defining our permission
activatord.permissions.canAccessMemberInfo
Note🚦: In this case, the name is much more generic than in case 1.
{
    "resourceName": "",
    "title": "Permission to access member info",
    "abstract": "true",
    "description": "Permission to access member info",
    "titleResKey": "",
    "descResKey": ""
}
To remove this permission, the model will be:
{
    "identity": { //The user we want to grant the access
        "recordId": the_user_id,
        "name": the_user_name,
        "type": "User"
    },
    "resource": { // The resource we want to secure
        "recordId": the_resource_id,
        "name": the_resource_name,
        "context": "localization", // ["contact", "confidential", "all", "etc..."]
        "type": "EntityRecord"
    }
}
| PROPERTY | Description |
|---|---|
identity |
|
resource |
|
Conclusion
The Permission🗝️ component in Activator is crucial to the secure management of resource access, enabling users' access rights to be precisely defined according to their identity, the resources concerned and the context of use. By integrating elements such as identity and resource, it offers a flexible structure that promotes granular permissions management, ensuring that only authorized people can interact with sensitive information. This approach helps protect critical data while meeting confidentiality and regulatory requirements, making the Permission component an essential tool for ensuring the security and integrity of information in Activator.
Whereas permissions define specific rights to certain resources, roles allow you to group together several permissions and assign sets of rights to users according to their responsibilities. Let's move on to the Roles component, which plays a central role in structuring and simplifying access management within the system.