Notifications
Notifications🗳️ in Activator are messages or alerts sent to users to inform them of specific events, actions to be taken, or changes in the system. They can be triggered by system events or manual actions, and they help keep users informed in real-time.
Graphic Presentation
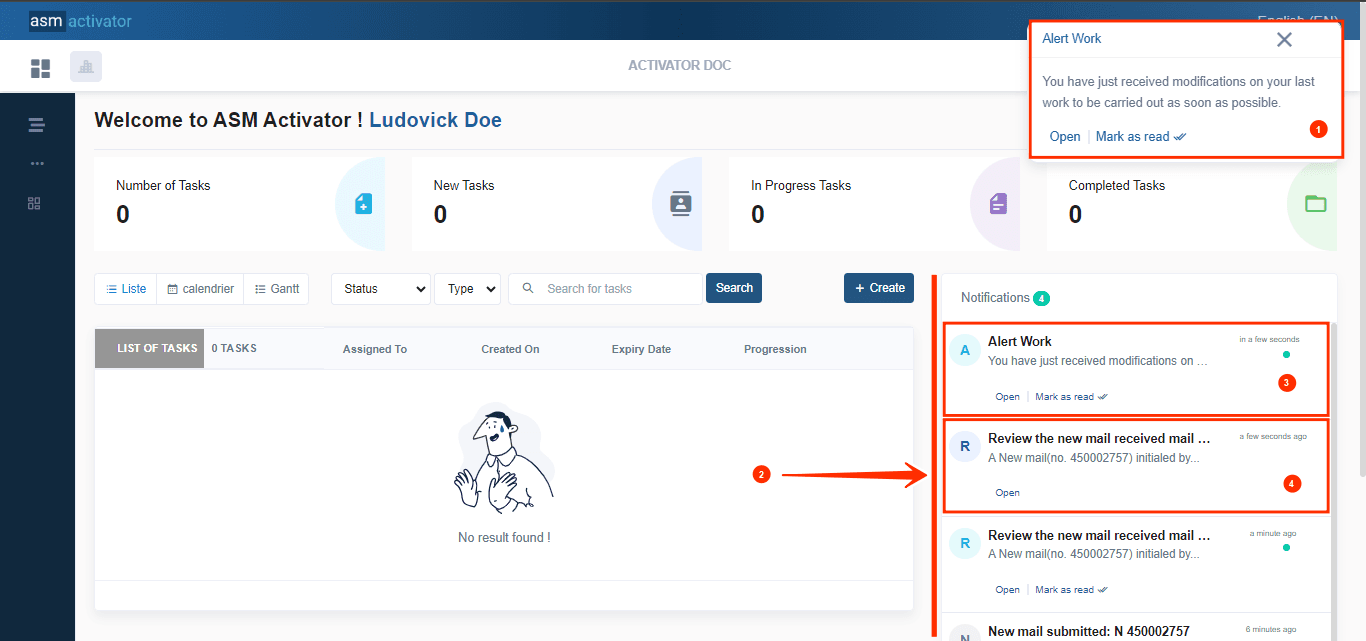
The image illustrates the graphical presentation of notifications within the Activator system interface.
We have:
- (1) We have a pop-pup that signals the arrival of a new notification (a sound is implemented to specify this arrival) and is described by a title and a description. This pop-pup natively implements two buttons “Open” and “Mark as read”.
- (2) A panel that displays notification history and lets users interact with their notifications to manage them efficiently.
- (3) Unread notification: This is indicated by a small green pointer to the right of the notification. This means that the user has not viewed the notification. Each notification of this type natively implements the "Open" and "Mark as read" buttons.
- (4) Read notification: There is no green pointer, indicating that the notification has already been read or acknowledged by the user. Notifications of this type natively implement the "Open" button.
Create a Notification
There are two components involved in creating a notification: Entity and Driver.
Let's take a look at how these components enter into the creation of a notification.
Creating An Entity
In Activator Admin, the Entity component for creating notifications is located in the menu container as shown in (1) in the image below👇.
✋NB: Make sure you are in the Entities main module.
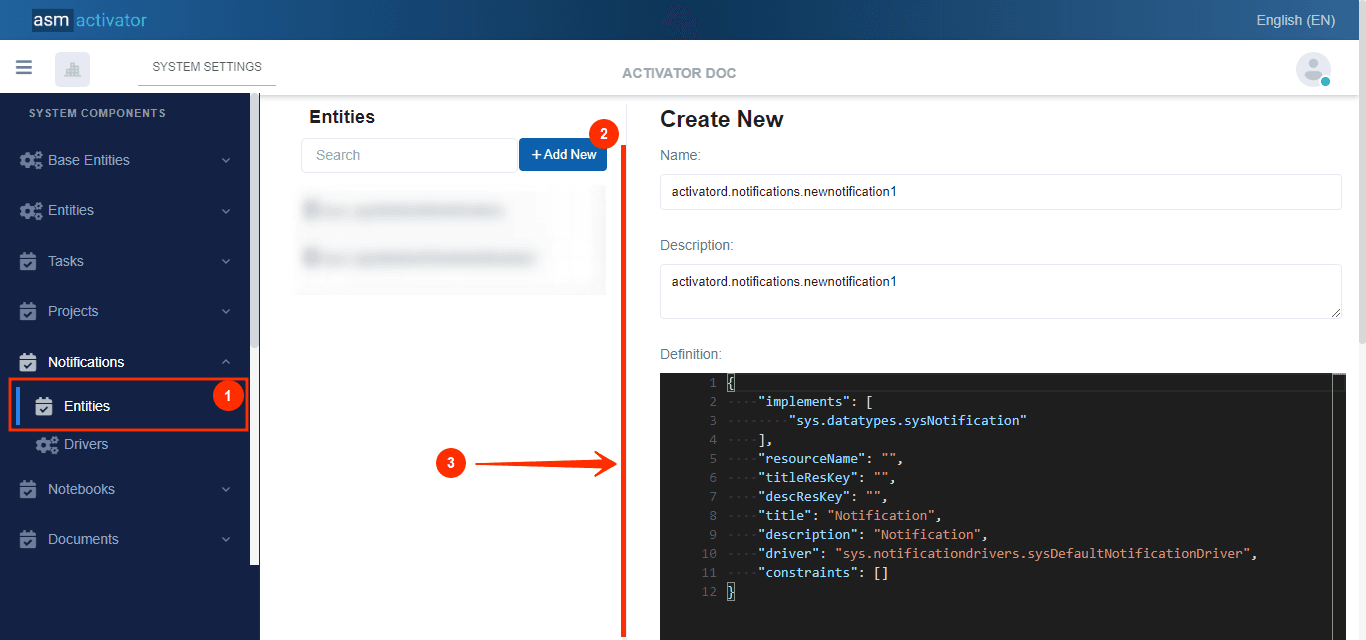
After initiating the creation of the Entity, by clicking on the +Add new button (illustrated at (2) on the image above), you’ll observe a form (illustrated at (3) on the image above) appearing on the right side with some fields.
🔬After filling in the name and description fields, let's focus on the Definition and Meta Data fields.
The Meta Data field gathers and provides additional information for the component, please refer to Meta Data for the complete list of additional information related to this component.
As for the Definition field, let's take a closer look at its Json content in the next point.
JSON Definition Content
{
    "implements": [
        "sys.datatypes.sysNotification"
    ],
    "resourceName": "",
    "titleResKey": "",
    "descResKey": "",
    "title": "Notification",
    "description": "Notification",
    "driver": "sys.notificationdrivers.sysDefaultNotificationDriver",
    "constraints": []
}
Definition Description
The JSON provided by Activator is the basic model used to create an entity essential to the generation of notifications. Here's an analysis of its main properties:
| PROPERTY | REQUIRED | DEFAULLT VALUE | DESCRIPTION |
|---|---|---|---|
implements | Yes | sys.datatypes.sysNotification | Defines the data type required to create notifications. Although it can implement several data types, it should be noted that the data type |
resourceName | No | "" | Used to define the name of the resource associated with the Entity. |
nameResKey | No | "" | This resource key is used to translate the Entity title |
descResKey | No | "" | Translation key for entity description |
title | No | "" | Specifies Entity title |
description | No | "" | This field provides a textual description of the Entity. |
driver | No | sys.notificationdrivers.sysDefaultNotificationDriver | It will handle the various notification displays. Find out more about the driver |
constraints | No | [] | Contains constraints that apply to the data type fields implemented by this Entity. To find out more about constraints, see the detailed section here. |
To get the model of the default dataType(sys.datatypes.sysNotification) found in the implements property, you'll need to use the Api. Thus, you will have the following model that must be submitted for a notification.
{
    "extends": [
        "sys.datatypes.sysEntity"
    ],
    "attributes": [
        {
            "name": "title",
            "required": "true",
            "dataType": "string",
            "validation": [
                "RequireValue"
            ]
        },
        {
            "name": "description",
            "required": "true",
            "dataType": "string",
            "validation": [
                "RequireValue"
            ]
        },
        {
            "name": "notificationAttributes",
            "required": "true",
            "dataType": "List<sys.datatypes.sysNotificationAttribute>",
            "minItemsCount": 1,
            "validation": [
                "RequireValue"
            ]
        }
    ]
}
Create A Driver
In Activator Admin, the Driver component for creating notifications is located in the menu container as shown in (1) in the image below👇.
✋NB: Make sure you are in the Entities main module.
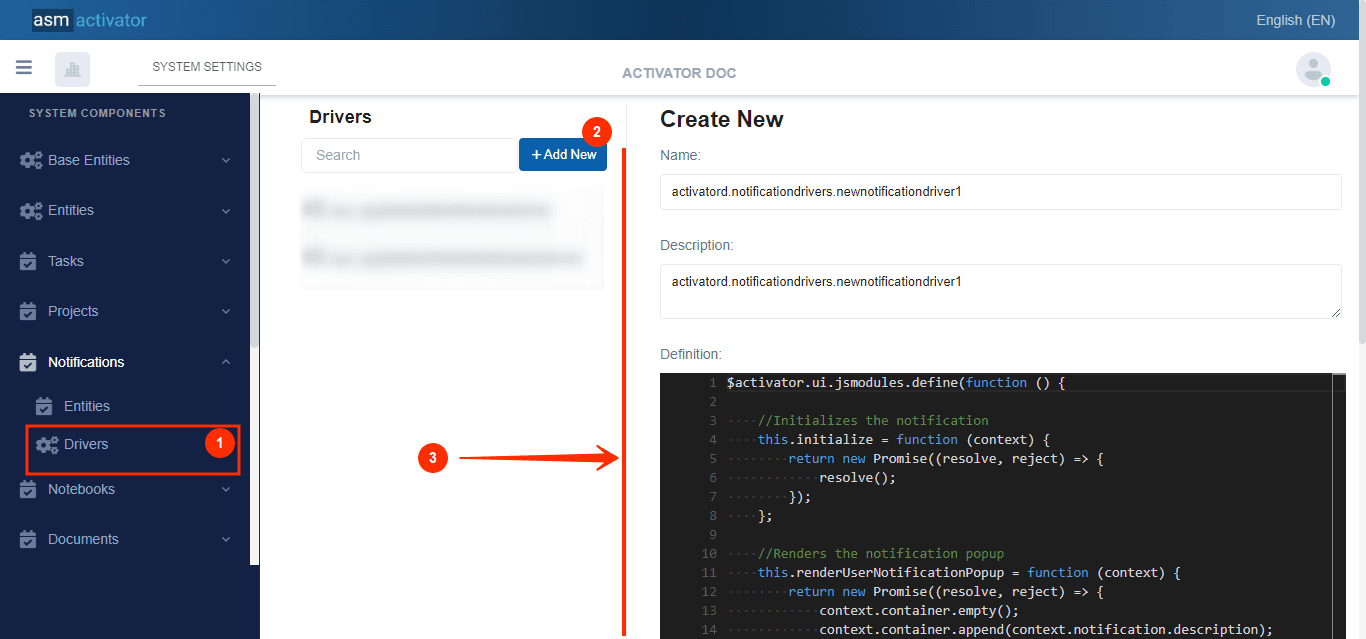
After initiating the creation of the Driver, by clicking on the +Add new button (illustrated at (2) on the image above), you’ll observe a form (illustrated at (3) on the image above) appearing on the right side with some fields.
🔬After filling in the name and description fields, let's focus on the Definition and Meta Data fields.
The Meta Data field gathers and provides additional information for the component, please refer to Meta Data for the complete list of additional information related to this component.
As for the Definition field, let's take a closer look at its JavaScrit content in the next point.
Definition
$activator.ui.jsmodules.define(function () {

    //Initializes the notification
    this.initialize = function (context) {
        return new Promise((resolve, reject) => {
            resolve();
        });
    };

    //Renders the notification popup
    this.renderUserNotificationPopup = function (context) {
        return new Promise((resolve, reject) => {
            context.container.empty();
            context.container.append(context.notification.description);
            //context.addActionItem({
            //    name: 'actionItem1',
            //    title: 'Action Item 1'
            //});
            //context.addActionItem({
            //    name: 'actionItem2',
            //    title: 'Action Item 2'
            //});
            resolve();
        });
    };

    //Renders the notification in the history list
    this.renderUserNotification = function (context) {
        return new Promise((resolve, reject) => {
            context.container.empty();
            context.container.append(context.notification.description);
            //context.addActionItem({
            //    name: 'actionItem1',
            //    title: 'Action Item 1'
            //});
            //context.addActionItem({
            //    name: 'actionItem2',
            //    title: 'Action Item 2'
            //});
            resolve();
        });
    };

    //Handles action item
    this.handleActionItem = function (context) {
        //switch (context.actionItem.name) {
        //    case 'actionItem1':
        //        console.log('actionItem1 was clicked.');
        //        break;
        //    case 'actionItem2':
        //        console.log('actionItem2 was clicked.');
        //        break;
        //}
    }

});
This JavaScript code defines a module in Activator for handling a custom notification driver. The driver includes methods to initialize, render, and manage notifications, both in a pop-up format and in the notification history list. Here's a breakdown of the code:
Description
initialize(context)This method prepares the notification for use. The
contextparameter contains the necessary data related to the notification environment.
renderUserNotificationPopup(context)This method is used to display the notification in a pop-up format to the user. Its functions are as follows:
Clears the contents of the
context.container(which represents the container for the pop-up).- Appends the notification's description (
context.notification.description) to the container to display the message. - Optionally, additional buttons items (commented out for now) can be added to the pop-up by using
context.addActionItem()to allow users to interact with the notification.
renderUserNotification(context)This method displays the notification in the user's notification history panel.
- Like the
renderUserNotificationPopupmethod, it empties thecontext.containerand appends the notification's description to it. - Again, additional action items can be added, though this functionality is currently commented out.
handleActionItem(context)This method is responsible for managing the user's interactions with the action buttons associated with the notification. The method is prepared to handle different cases based on the action item clicked (for example,
actionItem1oractionItem2). However, this logic is commented out.
API to create Notifications
| PROPERTY | DESCRIPTION |
|---|---|
| URL |
|
| Method | PUT |
| Payload Model (Request Body) | The request body must be in JSON format and include information as in the following example: |
Conclusion
Notifications in Activator keep users informed of events in real time. Thanks to drivers and custom entities, they can be tailored to the specific needs of each user, improving communication and responsiveness within the system.
In addition to internal notifications, Activator also offers email notifications to inform users outside the platform.